Cash Drawer – Troubleshooting
This page provides quick solutions to common issues like delayed locking, drawer port errors (RJ11/RJ12), and incorrect open/close detection.
Learn how to configure pulse width settings and resolve sensor resistance problems to keep your cash drawer running smoothly.
Why Does the Cash Drawer Take Time to Lock After Triggering?
Solenoid Overload Warning: Pulse Width Too Long
If the solenoid valve that activates the cash drawer stays energized for too long, it can cause several issues:
- Overheating of the solenoid coil
- Magnetization of the shaft, preventing the drawer from closing properly until the magnetic field dissipates
- Potential damage to the solenoid mechanism over time
🎥 Demo Alert
A video demonstration shows the error caused by an incorrect pulse width setting exceeding 300ms, which can trigger these issues.
✅ Solution
Reduce the pulse width time to below 300ms to prevent overheating and ensure proper drawer operation.
We’re here to help—contact our team anytime with your questions.
How to Configure Pulse Width for Cash Drawer Activation
Most cash drawers function reliably with a pulse width between 100–200 milliseconds. Setting the correct pulse duration is essential for:
- Smooth and consistent drawer operation
- Preventing strain or damage to the solenoid valve
- Ensuring compatibility with various trigger mechanisms (USB, Bluetooth, etc.)
Avoid exceeding 200ms, as longer pulses may lead to overheating or mechanical wear. Always refer to your drawer’s technical specifications before making adjustments.
Recommended Pulse Width Settings
| Pulse Width | Duration | Effect |
|---|---|---|
| < 50 ms | < 0.05 sec | Too short; may fail to open drawer reliably |
| 100 ms | 0.1 sec | Common default; works well for most drawers |
| 200 ms | 0.2 sec | Safe and reliable for nearly all models |
| > 250 ms | ≥ 0.25 sec | Risk of overheating or solenoid strain |
Pulse Width Configuration Tips for Cash Drawers
- To ensure reliable performance and protect your hardware, follow these best practices:
Recommended Settings
- Standard Range: Set pulse width between 100–200 milliseconds.
- Avoid Overextension: Do not exceed 200ms—longer pulses won’t improve performance and may damage the solenoid.
Adjustment Guidance
- Where to Configure: Check your POS system or receipt printer settings. Pulse width adjustments are typically found in:
– Device configuration utilities
– Firmware or driver settings
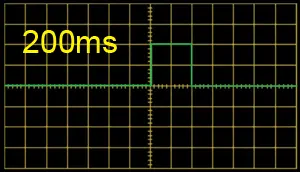
🎥 Demo Reference
The current video demonstration shows a pulse width setting of 100–200 ms, which is optimal for drawer operation.
Video Demo – Current Pulse-Width-Setting at 100~200 ms
We’re here to help—contact our team anytime with your questions.
Pulse Width Configuration for Acode Cash Drawers Trigger
For Acode cash drawers trigger, manual pulse width adjustment is generally unnecessary. These devices are engineered with hardware-defined default settings that ensure consistent and safe operation.
- No Manual Adjustment Needed Acode triggers—whether USB, Bluetooth, or push-button—come pre-configured with optimal pulse durations.
- Built-In Reliability Most Acode drawers operate smoothly with a pulse width between 100–200 milliseconds, already set by the hardware.
- Avoid Overextension Increasing the pulse width beyond 200ms is not recommended, as it may overload the solenoid, leading to overheating or mechanical wear.
These default settings are designed to protect your hardware and deliver reliable drawer performance without the need for manual tuning.
We’re here to help contact our team anytime with your questions.
Troubleshooting Cash Drawer Detection Issues in POS Systems
Common Causes :
Sensor or Hardware Issues –
- Misaligned drawer: If the drawer isn’t fully closed or seated properly, the sensor may misread its status.
- Worn-out sensor: Aging or faulty sensors can trigger false open/close signals.
- Loose or damaged cable: A faulty RJ cable or loose connector can disrupt communication between the drawer and POS.
Software or Configuration Errors –
- Incorrect POS settings: If the system isn’t set up for your specific drawer model, it may misinterpret its status.
- Driver problems: Missing or outdated drivers—especially for the receipt printer—can block drawer communication.
- Timeout settings: If the drawer doesn’t open within the expected timeframe, the POS may log an error even if it opens later.
How to Diagnose and Fix –
- Inspect the sensor: Clean gently and check for physical damage or misalignment.
- Test manual operation: Use the drawer key to open/close manually and observe if the error persists.
- Run diagnostics: Use your POS system’s “test drawer” or “kick-out” command to verify functionality.
- Check connections: Reseat the RJ cable and inspect for wear or loose plugs.
- Review POS settings: Ensure options like “Cash Drawer Connected” are enabled and correctly configured.
- Update firmware/drivers: Especially for the receipt printer, which often controls drawer activation.
POS Terminal Sensitivity to Sensor Resistance: Causes and Solutions
Sensor Resistance Tolerance in POS Terminals
What resistance tolerance does your POS terminal support? Over time, sensor resistance can drift or degrade, and terminals with narrow tolerance thresholds may misinterpret these changes—resulting in unreliable drawer status detection or outright sensor failure.
Recommended Solutions:
- Verify that your sensors consistently operate within the terminal’s supported resistance range to ensure accurate performance.
- Upgrade to the AT10U3 USB Cash Drawer Trigger, which offers broader tolerance levels and real-time monitoring of drawer open/close status—boosting compatibility and reliability.
We’re here to help—contact our team anytime with your questions.
Why Resistance Tolerance Matters for POS Terminal Sensors ?
POS terminals rely on precise resistance values from sensors to detect whether a cash drawer is open or closed. Even small deviations can cause misinterpretation.
Sensor Drift Over Time: A Hidden Threat to POS Accuracy
What Is Sensor Drift?
Sensor drift is the gradual change in a sensor’s resistance over time, caused by aging, environmental conditions, or mechanical wear. It’s not just a minor fluctuation—it can seriously undermine the reliability of POS readings.
Why It’s a Problem ?
- POS terminals use strict resistance thresholds to detect drawer status.
- A sensor calibrated at 0–50 Ω may drift to 55 Ω or more, exceeding the terminal’s tolerance range.
- This shift lowers the output voltage, potentially dropping it below the terminal’s detection threshold.
- The result? Missed drawer status changes, false readings, or complete detection failure.
How to Prevent It ?
- Use sensors with tight resistance tolerance and stable long-term performance.
- Choose POS terminals or triggers that support broader resistance ranges or offer real-time monitoring, such as the AT10U3 USB Cash Drawer Trigger.
We’re here to help—contact our team anytime with your questions.
Cash Drawer Not Responding via RJ11/RJ12 Port?
Try These Steps :
1. Run a Test Kick-Out
- If your POS system supports it, send a test command to “kick out” the drawer.
2. Check POS Software Settings
- Ensure your POS system is configured to open the drawer after cash transactions.
- Look for drawer settings under “Peripheral” or “Printer” options in your POS software.
3. Inspect for Mechanical Issues
- Open the drawer manually with a key.
- Remove any jammed coins or bills.
- Clean and lubricate the drawer tracks if it sticks or doesn’t slide smoothly.
4. Check the Physical Connection
- Make sure the RJ cable is securely plugged into:
- The cash drawer
- The receipt printer or POS terminal DK port
- Try reseating the cable (unplug and replug both ends).
- Inspect the cable for visible damage or bent pins.
5. Test the Drawer Manually
- Use the manual key to open the drawer.
- If it doesn’t open manually, the issue may be mechanical, not electrical.
6. Contact Support
- If all else fails, reach out to the service department for further assistance.