How to Install the ALD Customer Display on Windows System?
Step 1: Pre-Installation Checklist
Download the utility from ACODE’s official website.
- Download ALD Utility : https://www.acode.com/en/download/ald-vmp-display-driver-with-vmp-virtual-com-utility-3r2/
- Download Testing Utility : https://www.acode.com/en/download/ads-cash-drawer-ald-customer-display-testing-tool/
Step 2 : How to Disable Driver Signature Enforcement:
- Login windows administrator.
- Temporarily Disable BitLocker (if enabled) to prevent installation conflicts.
- Driver Signature Enforcement: Some ALD displays use unsigned drivers. You’ll need to disable this feature temporarily to proceed.
To do this:
- Hold Shift and click Restart from the Start menu.
- Navigate to: Troubleshoot → Advanced Options → Startup Settings.
- Click Restart.
- When prompted, press F7 or 7 to select Disable Driver Signature Enforcement.
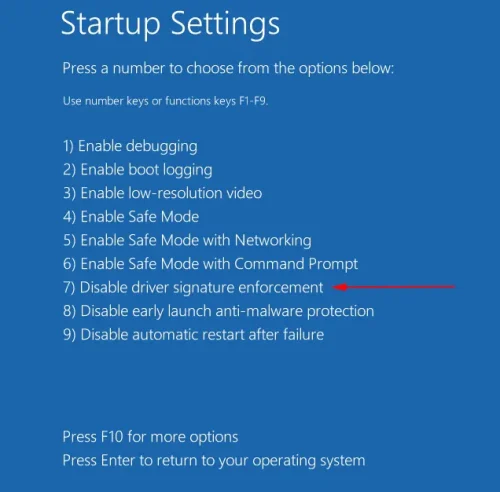
Note: This change is temporary and will reset after the next reboot.
Step 3: Connect the ALD Customer Display
- Log in with Windows Administrator privileges.
- Connect the ALD Customer Display to an available USB port.
- Automatic Setup: Windows will recognize the device as a USB Serial Device and automatically install the Display Utility.
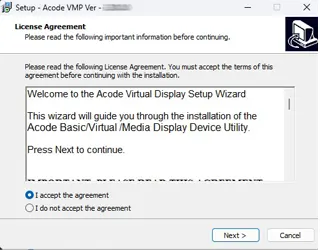
Step 4: Install the ALD Customer Display Utility
- Locate the installation file named AcodeVMPSetup_xxxxx.exe.
- Right-click the file and select “Run as administrator” to begin the installation process.
Step 5: Launch the ALD Customer Display Utility
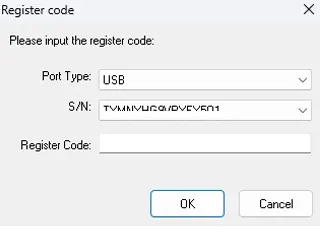
- Manually execute ‘AcodeVMP.exe’ from the installation directory.
- Please enter Register Code to start ALD Utility
Step 6: Verify Display Configuration Settings
- Check the Serial COM Port:
- Press Windows + X and select Device Manager.
- Expand the Ports (COM & LPT) section.
- Look for entries such as Acode Customer Display (COM_x).
- Launch the Display Utility:
- Open it from the Start menu or directly from the installation folder.
Note : Any changes made here will reset after the next system reboot.
Step 7: Configure Display Settings
- Launch the Customer Display Utility.
- Click the “ALD Settings” button located in the bottom-right corner of the window.
- Use the testing tools to connect and verify the current COM port.
Step 8: Connect Your POS System to the ALD Customer Display
- Select the correct COM port: Open Device Manager and check under Ports (COM & LPT) to identify the appropriate port.
- Choose the correct command set: Based on your POS system, select the compatible protocol (e.g., ESC/POS) to ensure proper communication with the display.
Step 9: Adjust Region & Language Settings
To ensure proper localization and app compatibility:
- Go to Settings → Time & Language → Region.
- Set your Country or Region.
- Under Language, add and install your preferred language.
- Set it as the Windows display language.
- Sign out and back in if prompted.