Cash Drawer Trigger – Troubleshooting
This guide covers common issues across models like AT10PB, AT10U3, AT10ME, AT10M3, and AT10M3-S. Learn how to test functionality, resolve power-related shutdowns, fix open/close detection errors, and interpret LED indicators for smooth POS integration.

AT10PB AT10U3 AT10ME AT10M3 AT10M3-S
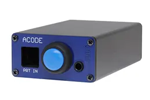
AT10PB Push Button Cash Drawer Trigger
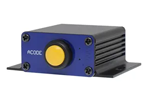
Why the AT10PB always shut down when using a power bank or smart power adapter?

The AT10PB Cash Drawer Trigger is a low-power consumption device and draws minimal current. Some portable power banks or Smart power adapter will automatically disable output if they detect very low current — mistakenly assuming no device is connected. This may cause unexpected power shutdowns.
🛠️ Solution Options
- Use a basic USB-C or USB-A DC5V power adapter
- Use a power bank with “Always-On” mode — designed to keep output active even under low current draw
- Upgrade to AT10M3 Cash Drawer Trigger :
-
AT10M3 Mobile Cash Drawer Trigger
- The AT10M3 Cash Drawer Trigger supports DC5V input, making it fully compatible with standard USB power plug and portable power banks.
- It also supports online charging, allowing continuous operation while connected to a power source — including mobile power banks.
-
We’re here to help—contact our team anytime with your questions.
AT10PB Check the equipment for proper functionality.
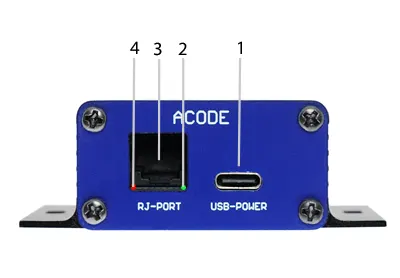
10PB LED Status Guide & Troubleshooting
A. Normal Operation
- 🟢 Green LED (2) ON: Power is connected and ready
- 🔴 Red LED (4) ON: Trigger signal is active
B. Both LEDs OFF
If neither LED is lit:
Action Steps:
- Plug in the USB power cable using a DC 5V USB power adapter
- Verify that both the USB cable and adapter are functioning properly
- If everything checks out but the LEDs remain off, the 10PB unit may be faulty → Please return it to the factory for inspection
🟢🔴 C. Both Green & Red LEDs ON
🧪 Troubleshooting Steps:
- Disconnect the USB power cable (Port 1) and RJ cable (Port 3)
- Reconnect the USB power cable and observe LED behavior
🔴 Red LED Behavior:
- Flashes once when button is pressed → Check the cash drawer and its cable → This test confirms drawer status; an open drawer may trigger the flash. Flashes once when the button is pressed again; the USB power cable needs to be disconnected
- Stays solid (no flash) → Disconnect USB power for 30 seconds, then reconnect → If issue persists, the 10PB may be damaged → Return to factory for inspection
- Does not light at all → If Green LED is ON but Red LED remains OFF → Likely a hardware fault — return to factory for repair
We’re here to help—contact our team anytime with your questions.
AT10U3 USB Cash Drawer Trigger

How to Set Up & Test the AT10U3 USB Cash Drawer Trigger on Windows ?
Setup & Troubleshooting Guide for USB Trigger Module
A. Hardware Connection
- Plug the USB trigger module into your PC.
- Connect the cash drawer to the trigger using an RJ11/RJ12 cable.
B. Driver Installation
- Most USB triggers require a virtual COM port driver.
- If Windows doesn’t install it automatically, download the correct driver from the .
C. COM Port Identification
- Open Device Manager → Expand Ports (COM & LPT).
- Note the COM port assigned to the USB trigger (e.g., COM3).
D. Testing Tools
- Launch the ACODE Cash Drawer & Customer Display Testing Tool.
- Alternatively, use a terminal program like PuTTY to send commands to the COM port.
E. Drawer Activation Test
Send any data to the COM port using:
- Terminal software
- POS software
- ACODE Testing Tool
If successful, the drawer should open.
F. POS Software Configuration
In your POS system settings:
- Select Serial Cash Drawer
- Choose the correct COM port
- Use the built-in test function to verify operation
G. LED Status & Troubleshooting
LED Indicators:
- 🟢 Green LED ON: Power is active
- 🔴 Red LED ON: Trigger signal is ready
If both LEDs are ON:
- Press the test button or send a command
- Observe the Red LED behavior:
| 🔴 Red LED Behavior | Action |
|---|---|
| Flashes once | Check the drawer and cable. Reconnect and retest. |
| Stays ON (no flash) | Disconnect USB for 30 seconds, then reconnect. If unresolved, unit may be damaged. |
| Does not light at all | If Green LED is ON but Red LED remains OFF, the unit likely needs repair. |
We’re here to help contact our team anytime with your questions.
T10U3 Cash Drawer Trigger cannot detect cash drawer open/close status ?
Common Reasons & Fixes :
A. Cash Drawer Lacks a Sensor
- Not all cash drawers have built-in sensors to detect open/close status.
Solution: Confirm with the manufacturer whether your drawer supports status detection via RJ11/RJ12 pins (typically pins 3 & 6). - Trigger Model Doesn’t Support Status Detection , Please check cash drawer sensor type.
B. Incorrect Sensor Type Configuration :
Cash drawers use either:
- Normal Open (NO): Sensor circuit is open when drawer is closed.
- Normal Close (NC): Sensor circuit is closed when drawer is closed.
C. POS Software Doesn’t Poll Status :
- Your POS system must actively check the COM port for status return codes.
Solution: Integrate status polling in your POS software.
We’re here to help—contact our team anytime with your questions.
Step-by-Step Setup & Testing (Windows / Android Version)
A. Connect Cash Trigger
- Plug in the Cash Trigger to the appropriate port on your device.
B. Check Indicator Lights Under RJ-Port
- Send an open cash drawer command or pass button to test.
| LED Status | Description |
|---|---|
| 🟢 Green LED ON | Power supply is normal. |
| 🟢 Green LED OFF | No power input or the trigger may be damaged. |
| 🔴 Red LED ON | Cash drawer trigger is ready. |
| 🔴 Red LED OFF | Trigger may be damaged. |
| 🔴 Red LED lights up slowly | Normal behavior — LED becomes steady 4 seconds after being triggered. lights up over 8 seconds check power adapter. |
Step 3: Testing via Windows
- You can verify the trigger signal using the Windows COM port utility or diagnostic software.
- The test steps can check via windows TS2-0010-010 or Via Android TS2-0010-013
AT10U3 Cash Drawer Trigger Setup on Android: Step-by-Step Guide
A. Connect the Trigger
- Use an Android device with USB Type-C or OTG support.
- Plug in the USB trigger module.
- Connect the cash drawer using an RJ11/RJ12 cable.
B. Install the Terminal App
- Download and install Android Serial USB Terminal from the Play Store.
C. Send the Open Command
- Launch the Serial USB Terminal app.
- Configure it to connect to the USB trigger.
- Send a command to open the drawer.
D. LED Status & Troubleshooting
✅ Normal LED Behavior
- Green LED ON: Power is active.
- Red LED ON: Trigger is ready.
🛠️ Troubleshooting Steps
- Unplug both the USB data cable (port 1) and RJ cable (port 3).
- Reconnect the USB cable and observe the LEDs:
- Both LEDs ON:
- Green = power.
- Send command via Serial USB Terminal.
- Red LED flashes once: Check drawer and cable. Reconnect and retest.
- Red LED stays ON (no flash): Disconnect USB for 30 seconds, then retry. If unresolved, the unit may be faulty.
- Red LED does not light at all: If Green is ON but Red remains OFF, the unit likely needs repair.
- Both LEDs ON:
We’re here to help—contact our team anytime with your questions.
AT10B3 USB Cash Drawer Trigger
AT10M3 Mobile Battery Cash Drawer Trigger
AT10M3 LED Indicator & Maintenance Guide :
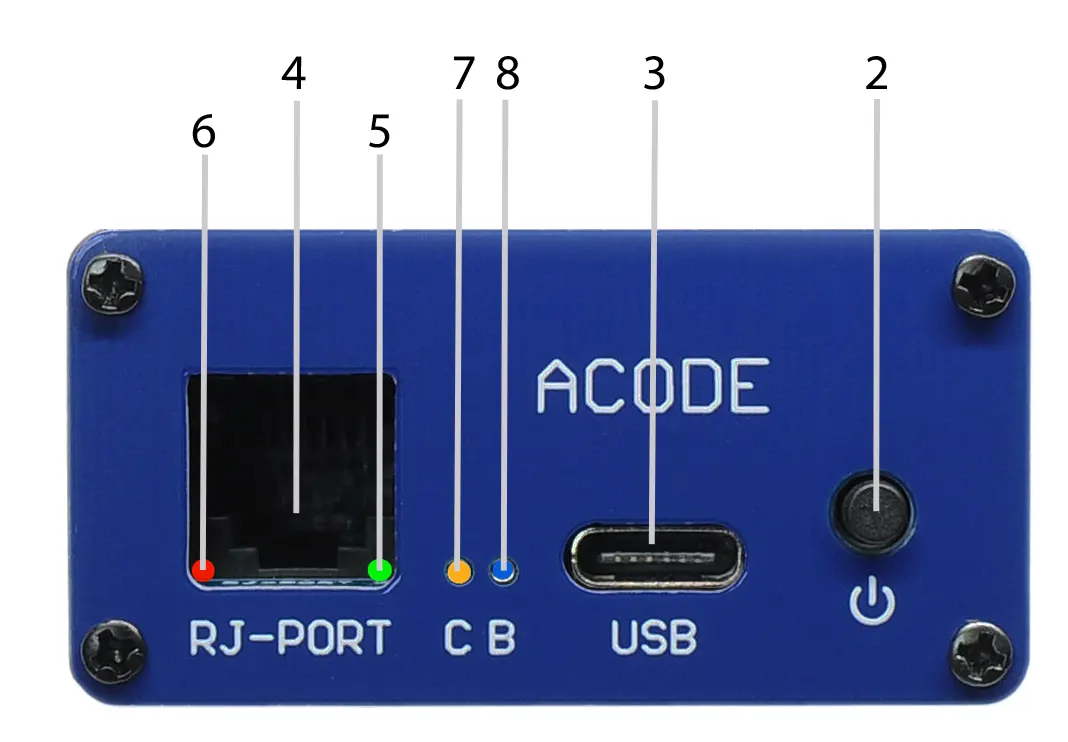
🔴 Red LED Lighting
- Normal Behavior: Red LED (6) takes approximately 6–8 seconds to illuminate — this indicates standard operation.
Step-by-Step Diagnostic Checklist
🟩 A. Green LED (5) Check
- After charging the device, unplug the USB power (3)
- If the Green LED (5) appears very dim, this may indicate a weakened battery or inadequate charging.
🔴 B. Red LED (6) Lights Up Very Slowly?
- Slow illumination beyond the expected 6–8 seconds could signal power deficiency or poor battery health.
⏱️ C. Short StandbyTime?
- Reduced standby time may result from a degraded battery or insufficient charge from the power source.
🛠️ Solution: Power Adapter & Battery Check
- ✅ Test the Power Adapter for proper function
- ✅ Charge the battery until the Yellow LED (7) turns off
- 🔍 If problems persist:
- Check the battery condition
- Ensure the power adapter delivers sufficient current
- If issues continue → Device may require maintenance
📘 For battery replacement instructions, refer to TS2-3030-011
A. Keep your workspace clean and tidy and free of any metal objects.
B. Unscrew the 2 screws on the back panel of the case, slide out the PCB, remove the old battery and replace it with a new one.
C. screw the 2 screws on the back panel of the case.
AT10M3-S Solar Power Cash Drawer Trigger
AT10M3-S LED Lighting & Maintenance Guide :
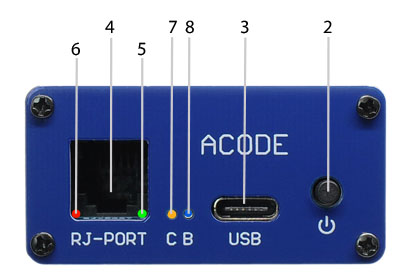
🔴 Red LED Behavior
- Standard Operation: Red LED (6) takes 6–8 seconds to light up after activation. This delay indicates normal function.
Step-by-Step Diagnostic Checklist
🟩 A. Green LED (5) Check
- After charging, unplug the USB power (3)
- If the Green LED (5) appears very dim, power retention may be low or battery performance is degrading.
🔴 B. Red LED (6) Lights Up Very Slowly?
- This could indicate weak power input or delayed response due to battery or solar issues.
⏱️ C. Short Standby Time?
- Standby time may be reduced if the battery doesn’t hold sufficient charge or the solar panel is underperforming.
Solution: Solar Panel & Battery Check
- ✅ Verify Solar Panel Output: DC6V / 6W
- ✅ Charge the battery until the Yellow LED (7) turns off
- 🔍 If the issue continues:
- Check the battery condition
- Confirm the power adapter current is sufficient
- If problems persist → Maintenance is required
📘 For instructions on battery replacement, refer to TS2-0030-011
AT10ME Buddy Cash Drawer Trigger
AT10ME Buddy cash drawer trigger basic testing
A. POS Printer Drawer Port Test :
- Connect the POS printer drawer port to the cash drawer using the appropriate cable.
- Test to open the cash drawer.✅ If the drawer opens, proceed to Section B.❌ If not, follow Solution 1.
B. AT10ME RJ-Port Test :
- Connect the AT10ME RJ-Port directly to the cash drawer.
- Test the open drawer function.✅ If the drawer opens, proceed to Section C.❌ If not, follow Solution 2.
we’re here to help—contact our team anytime with your questions.
C. Combined Connection Test
- Connect the AT10ME RJ-Port to the cash drawer.
- Also, connect the POS printer drawer port cable to the AT10ME PRT-IN port.
- Test both connections to open the cash drawer✅ If successful, Test is complete.❌ If the drawer does not open, follow Solution 2.
D. Testing Signal : Green 🟢LED ON and Red 🔴LED ON
- Troubleshooting Steps:
- Unplug the USB power cable (Type-C) and RJ cable (port 3)
- Reconnect the USB Data cable and observe LED status:
- If both LEDs turn on:
- Test Push Button :
-
-
-
- Unplug the USB power cable (port 1) and RJ cable (port 3)
- Reconnect the USB Type-C cable and observe LED status:
- If both LEDs turn on:
- Press the button while watching the Red LED
- 🔴 Red LED flashes once:
- Check the cash drawer and its cable
- This test is performed after reconnecting the cash drawer. The drawer may be open, which reflects the correct status
- 🔴 Red LED stays on (no flash):
- Disconnect USB power for 30 seconds and retry
- If problem persists, the unit is likely damaged — return to factory
- 🔴 Red LED does not light at all:
- If the Green LED is ON and the Red LED remains OFF, the unit may be damaged — return to factory for repair.
- If both LEDs turn on:
-
-
- Test Pos Printer Cash Drawer port open cash drawer :
-
-
- Unplug the USB power cable (port 1) and RPT RJ cable (port 3)
- Reconnect the USB Type-C cable , RPT RJ Cable and observe LED status:
- Control pos printer open cash drawer while watching the Red LED
- 🔴 Red LED flashes once:
- Check the cash drawer and its cable
- This test is performed after reconnecting the cash drawer. The drawer may be open, which reflects the correct status
- 🔴 Red LED stays on (no flash):
- Disconnect USB Type-C power cable for 30 seconds and retry
- If problem persists, the unit is likely damaged — return to factory
- 🔴 Red LED does not light at all:
- If the Green LED is ON and the Red LED remains OFF, the unit may be damaged — return to factory for repair.
-
-
Solution :
- Check POS Printer or cash drawer
- Check AT10Me to Pos printer short-link cable.
- AT10ME need maintenance.